WinRM - Remote Management of Windows
How to configure the WinRM Service correctly with a Powershell Script. Quick, easy and fast (SSL encryption).


Today it is about the automatic WinRM configuration. If WinRM is configured correctly, you can connect to a remote computer using Powershell.
This blog is also relevant if you use configuration management and automation tools like Ansible with Windows servers – the configurations are made using the WinRM interface. Windows can be completely remote managed by using the winrm interface. However, correct configuration is important.
$cred = get-credential remoteComputer\administrator
enter-pssession -computername remoteComputer -credential $cred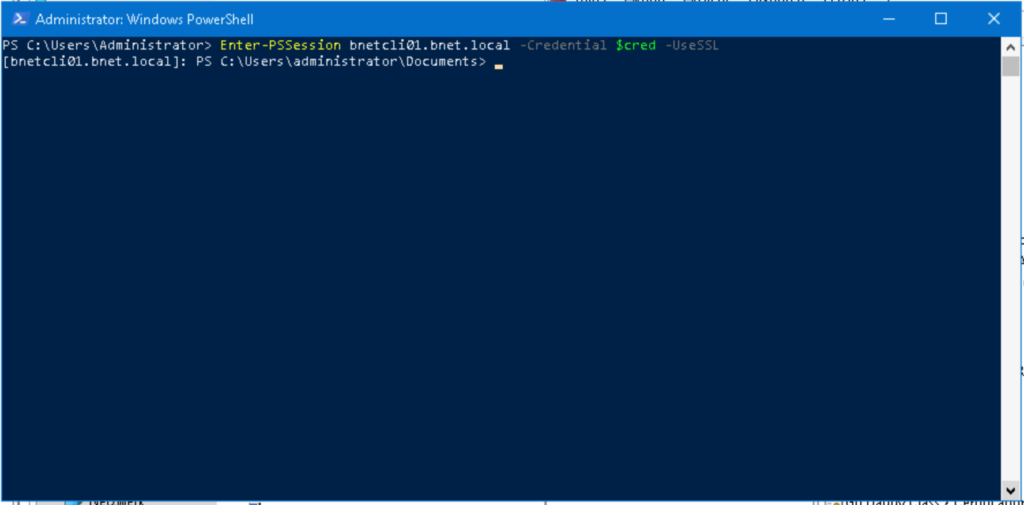
This blog is about how to correctly configure WinRM with encryption and authentication provider. We will make the following configurations:
- Configuration WinRM service
Turn on services - Windows firewall configuration
Allow traffic on port 5986 - Configuration WinRM listener and SSL certificates
Only allow encrypted traffic - Configuration WinRM Authentication Provider
We use CredSSP
We also have a script that does all the configuration automatically and which can be included in the GPO.
Content
- Windows Remote Management Service (WinRM)
WinRM service details - Manual WinRM Configuration
How to configure the WinRM service manually and securely (SSL encryption). - Configuration of CA
Configure your CA to automatically issue certificates for encrypted communication with the WinRM service - WinRM Settings Check
How to check the relevant WinRM settings on your computer and test access - Automatic WinRM Configuration
With a Powershell script you can automate the WinRM configuration easily, securely and quickly
Windows Remote Management Service (WinRM)
WinRM is a remote management protocol built into Windows. It is essentially based on the SOAP protocol and SOAP in turn is based on the HTTP(s) protocol.
With the help of WinRM, the configuration parameters of Windows can be queried and managed, also over the network. Starting with Windows 10, WinRM must be explicitly activated and configured. In order to take security into account, it is therefore important to make the configurations correctly.
opensight.ch – roman hüsler
WinRM uses ports 5985 (HTTP) and 5986 (HTTPS) for communication. Of course, we would like to configure the WinRM service in the course of this blog in such a way that only encrypted communication with the clients / servers is possible.
Manual WinRM Configuration
Configure WinRM Service
The service should run and be started automatically at Windows startup.
Set-Service -Name WinRM -StartupType Automatic
Set-Service -Name WinRM -Status Running
Configuration WinRM listener and SSL certificates
First, of course, we log on to the Windows computer on which WinRM is to be configured manually. Then we make sure that only encrypted communication with WinRM is possible.
# Deactivation of unencrypted Endpoints
Set-WSManInstance winrm/config/Listener -SelectorSet @{Address='*';Transport="HTTP"} -ValueSet @{Enabled="false"}
Now we need to have a certificate for running WinRM service on the Windows computer. A self-signed certificate can be issued for this purpose. Of course, it’s better to use your domain’s CA to issue a certificate.
Use of a self-signed certificate
The subject name of the generated certificate should match the FQDN of the computer, otherwise there will be problems later. We define the extension “2.5.29.37” (Key Usage) with the value “{text}1.3.6.1.5.5.7.3.1” (Server Authentication).
# generate self signed cert
$fqdn = "bnetcli01.bnet.local"
$cert = New-SelfSignedCertificate -Subject ("CN=$fqdn") -TextExtension '2.5.29.37={text}1.3.6.1.5.5.7.3.1' -CertStoreLocation Cert:\LocalMachine\My

# WinRM HTTPS Listener Configuration
New-WSManInstance winrm/config/listener -SelectorSet @{Address="*";Transport="HTTPS"} -ValueSet @{Hostname=$fqdn;CertificateThumbprint=$cert.Thumbprint}
Using a host certificate from the CA
If you have a CA, you should have a host certificate issued for the computer and then use this for the encrypted communication of the WinRM service. You can see how to configure the CA in the “CA configuration” chapter. When this is done, you can configure the WinRM HTTPS listener with the CA’s certificate.
# list trusted root certs
$trustedRootCerts = (get-childitem -Path Cert:\localmachine\root) | ForEach-Object { $_.Subject }

[String] $HostName = "bnetcli01.bnet.local"
[String] $Thumbprint = (get-childitem -Path Cert:\localmachine\my | Where-Object {
                    ($_.Issuer -in $trustedRootCerts) -and
                    ($_.Extensions.EnhancedKeyUsages.value -eq '1.3.6.1.5.5.7.3.1') -and
                    ($HostName -in $_.DNSNameList.Unicode.toLower()) -and
                    ($_.Subject.ToLower() -like "cn=$HostName") } | Select-Object -First 1
).Thumbprint
New-WSManInstance winrm/config/listener -SelectorSet @{Address="*";Transport="HTTPS"} -ValueSet @{Hostname=$HostName;CertificateThumbprint=$Thumbprint}
Authentication Provider
WinRM supports various authentication mechanisms. In this blog article we will use CredSSP.
- Basic
The simplest method and also the least secure. Username and password are simply Base64 encoded and sent over the network. This is particularly problematic in combination with unencrypted communication (HTTP). - Certificate
Certificates (similar to SSH key pairs) are used for authentication. - NTLM
NTLM is an older authentication mechanism from Microsoft and can be used to authenticate both local and domain accounts. - Kerberos
Recommended as an authentication mechanism in Windows Domain Environments. - CredSSP
A newer authentication protocol.
We make sure that the basic authentication cannot be used and turn on the CredSSP authentication provider.
# basic auth deactivation
set-item -Path WSMan:\localhost\Service\Auth\Basic -Value false
set-item -Path WSMan:\localhost\Service\Auth\CredSSP -Value true
restart-service -ServiceName WinRM
Windows Firewall
Allow inbound traffic on port 5986.
$FirewallParam = @{
    DisplayName = 'Windows Remote Management (HTTPS)'
    Direction = 'Inbound'
    LocalPort = 5986
    Protocol = 'TCP'
    Action = 'Allow'
    Program = 'System'
}
New-NetFirewallRule @FirewallParam
Configuration CA
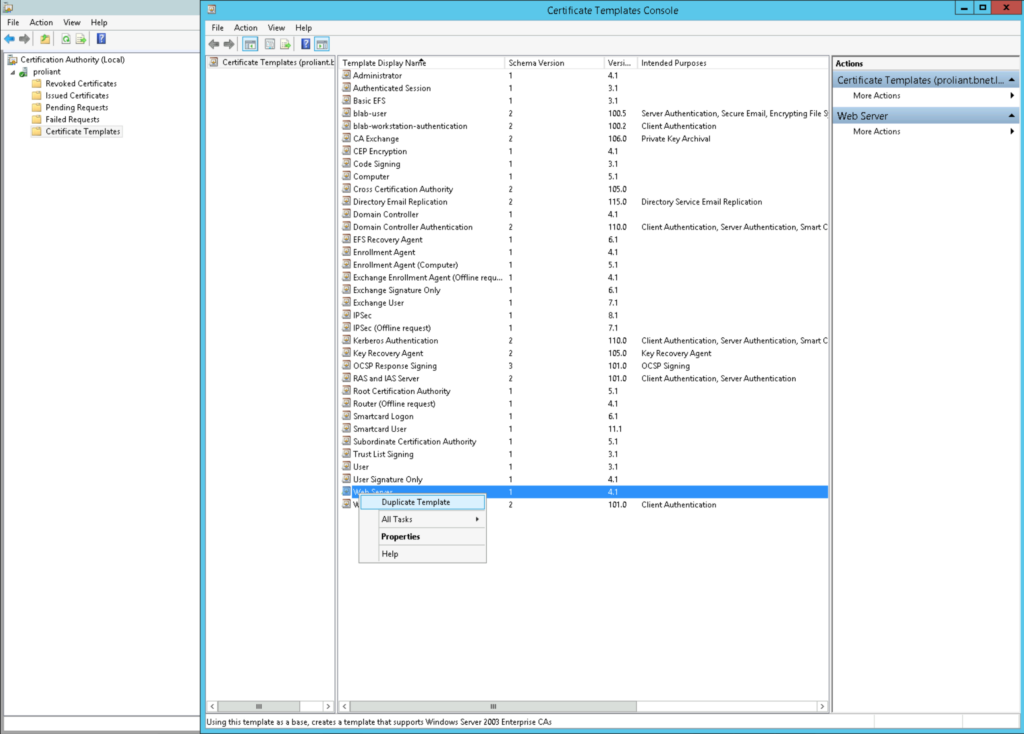
Now we should make sure that every Windows 10 client that we want to access later has a valid computer certificate. We assume you already have a CA set up on a server in your domain. In our Certificate Authority we “right click” on “Certificate Templates” and select “Manage”. After that we clone the “Web Server” template.
The following configurations are to be made:
- “General” tab
Name: WinRM - “Subject Name” tab
Activate “Build from this Active Directory Information”. - “Subject name format”: “Common Name”
Just tick “DNS Name”. - “Security” tab
Domain Computers: Read, Enroll and Autoenroll permissions
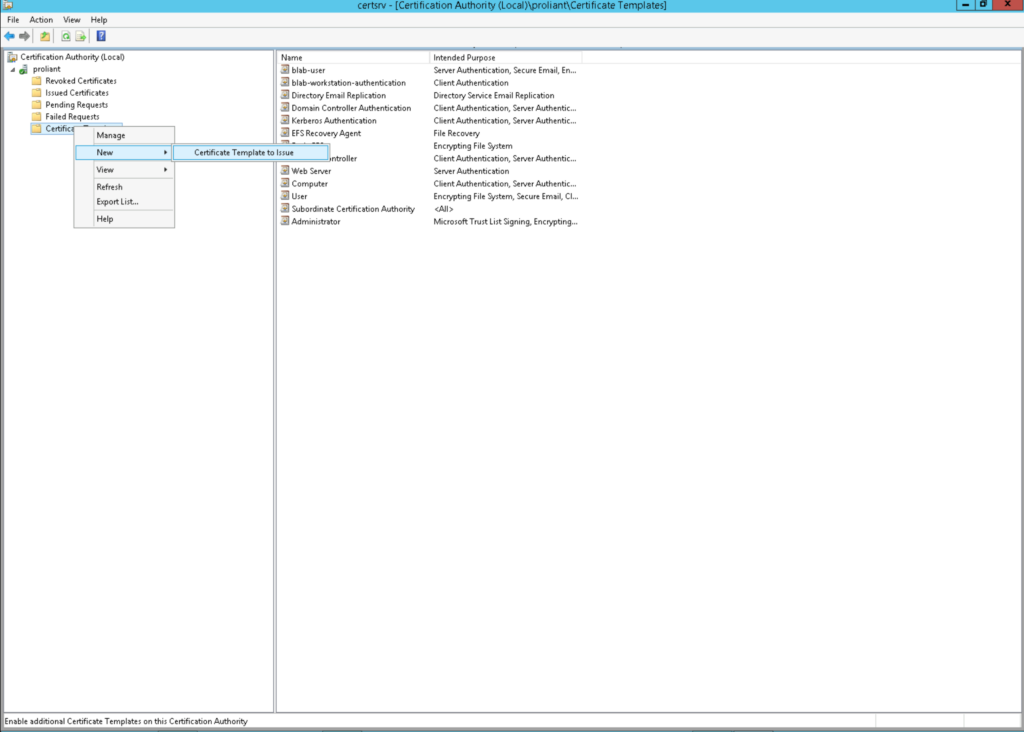
Now the certificate can be issued to all clients. Select “Certificate Template to Issue” and then select the template you just created. If you now reboot one of your Windows 10 computers, it should automatically receive a device certificate.
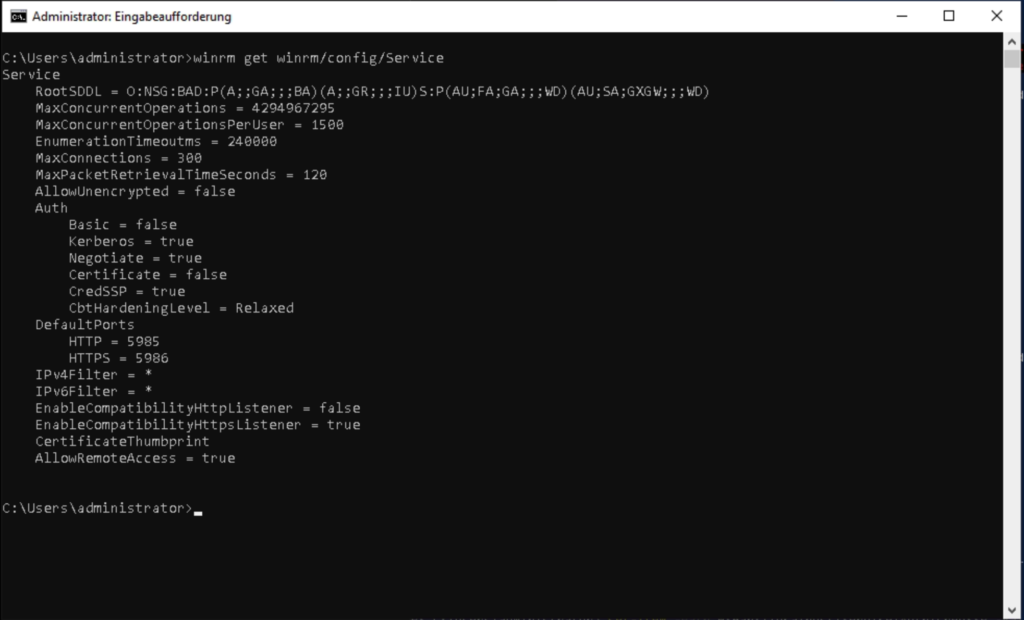
WinRM Settings check
Now it’s time to double check that all the settings are correct.
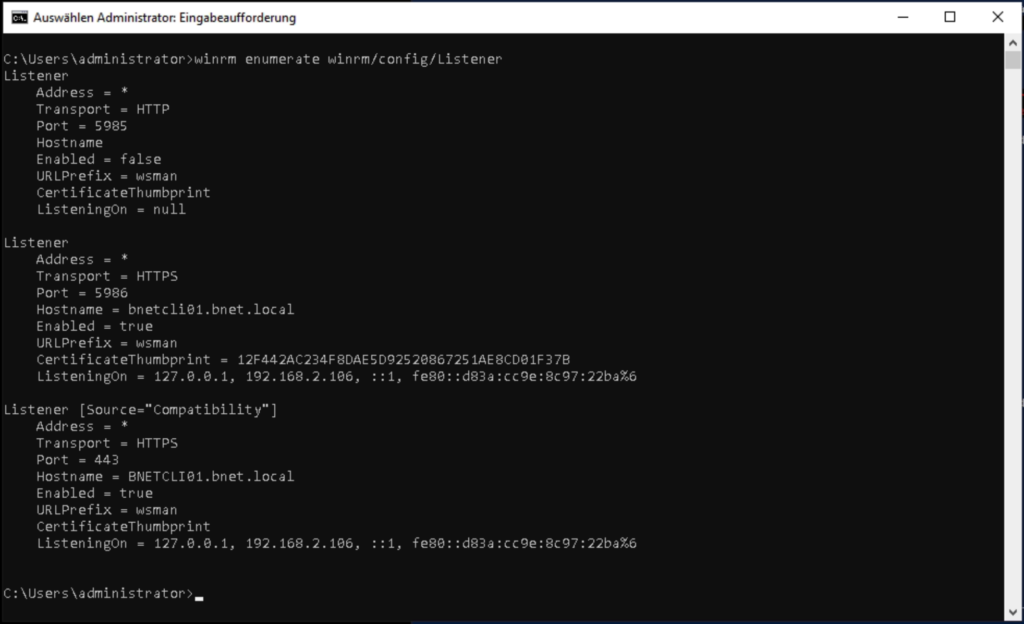
# WinRM Listener check
winrm enumerate winrm/config/Listener

# WinRM Authenticator check
winrm get winrm/config/Service
As desired, the HTTP listener is disabled (you can also remove it completely) and the thumbprint of the certificate to be used is entered for the HTTPS listener, which is located in the “LocalMachine” certificate store. (picture below)
Verify access
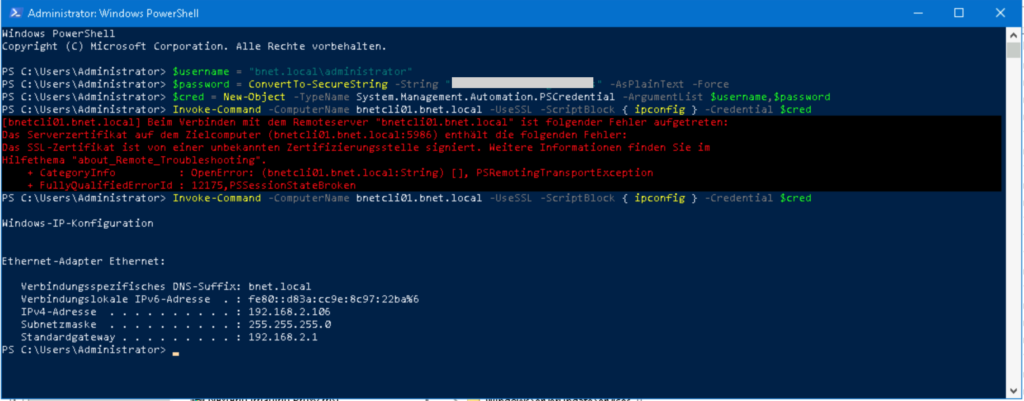
Now let’s try WinRM and access Windows 10 client from a remote system to run “ipconfig” command. To do this we will use the following commands:
$username = "domain\username"
$password = ConvertTo-SecureString -String "password" -AsPlainText -Force
$cred = New-Object -TypeName System.Management.Automation.PSCredential -ArgumentList $username,$password
Invoke-Command -ComputerName remoteComputer -UseSSL -ScriptBlock { ipconfig } -Credential $cred
As can be seen in the picture, the attempt to connect initially did not work. The reason:
In this case, a self-signed certificate was generated for WinRM on the remote computer. This must be exported from the certificate store on the remote computer and entered into the “Trusted Root” store on the accessing system. With a certificate issued by the domain CA, this would not be a problem. The certificate of the domain CA is usually already entered in the Trusted Root Store on all Windows clients that are members of the domain.
Automatic WinRM configuration
In order to do all mentioned configuration automatically we created a Powershell script for automatic WinRM configuration. You can include this in the GPO, for example, as a logon script (use at your own risk).
The script is available free of charge from our downloads and it automatically makes the following settings:
- Configure WinRM Windows Service
Make sure the service is enabled and startup is automatic - Configure Windows Firewall
Allow traffic on port 5986 with rule ‘Windows Remote Management (HTTPS)’ - WinRM Listener Configuration and SSL Certificates
Only allow encrypted traffic on port 5986. If possible, use the Cert from Domain CA (this CA has to be configured manually of course). If no CA Cert is available, create a self-signed cert (friendly name: ‘OpensightWinRMHostCert’) - WinRM Authentication Provider Configuration
Make sure basic authentication is switched off and credssp is switched on